


User Session Management
Introduction
Cripsa Inc Backend Systems offers a comprehensive managed identity service designed to simplify the management of user identities and authentication within your applications. This service includes integrated support for user session management, a critical aspect of user authentication and authorization. This document aims to provide a comprehensive guide to effectively managing user sessions in Cripsa Backend Systems through the utilization of API endpoints.
Before proceeding with the session management process, the Client/Development team is required to complete the following prerequisites:
- Create or Choose a Project: Access the Cripsa Inc platform at https://cripsa.com and either create a new project or select an existing one.
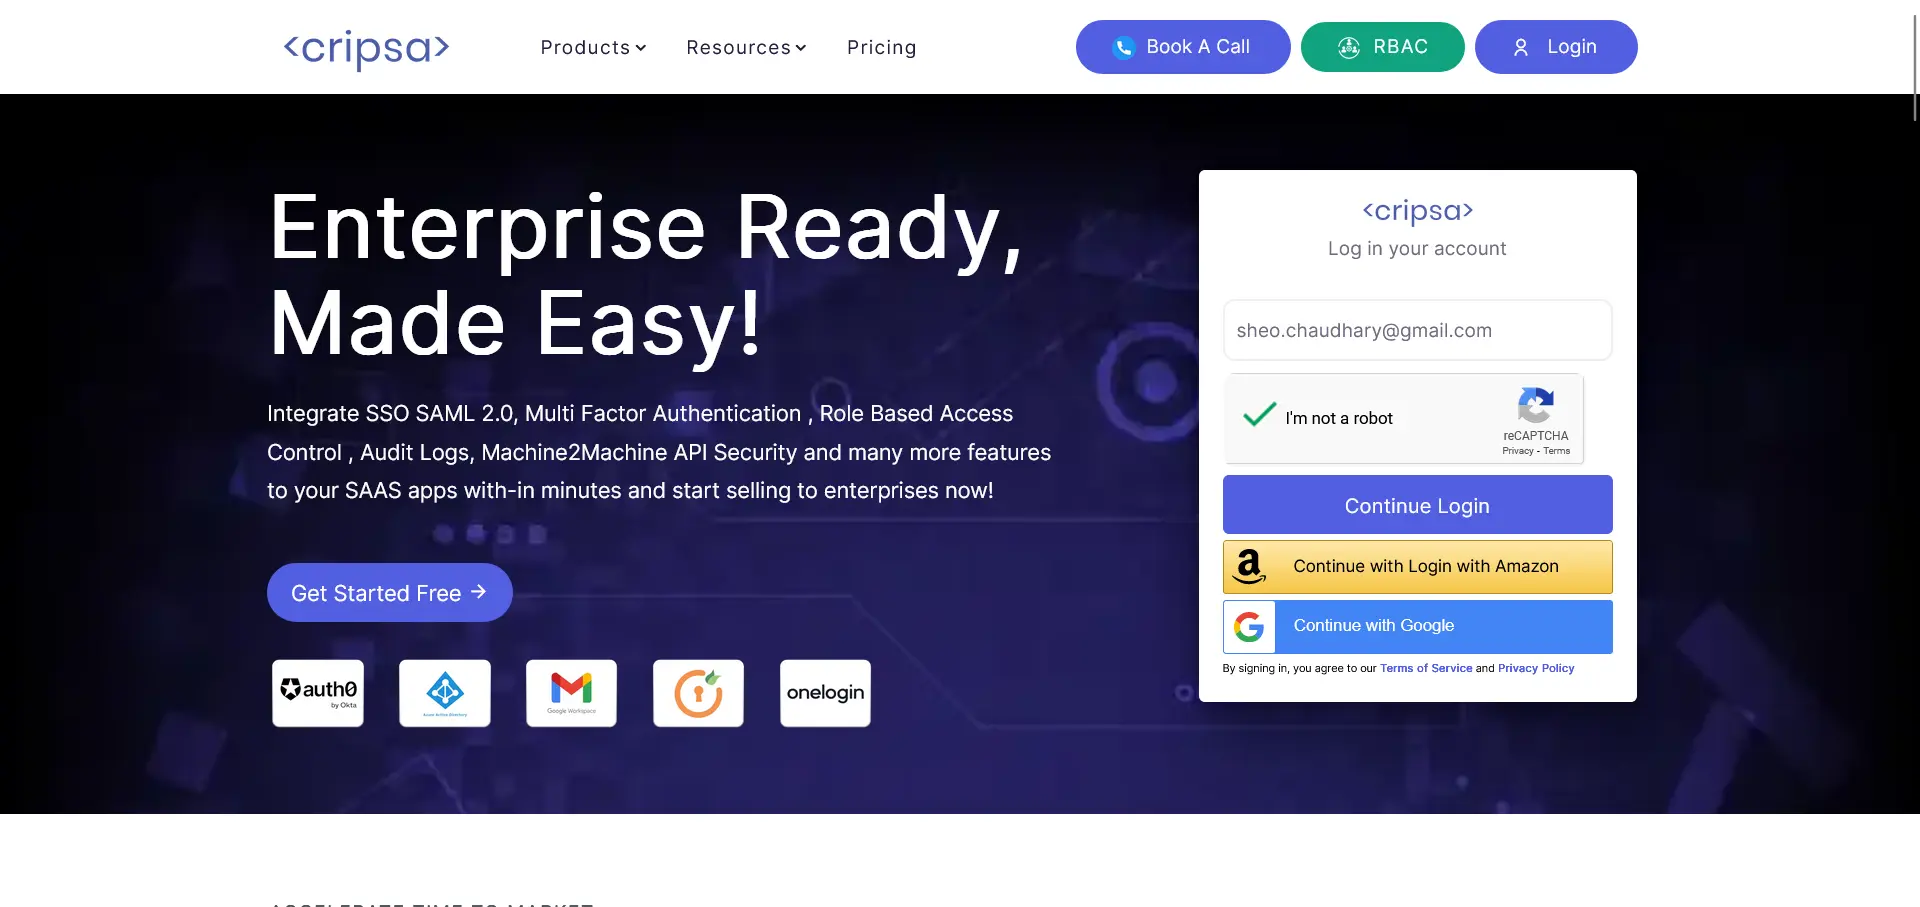
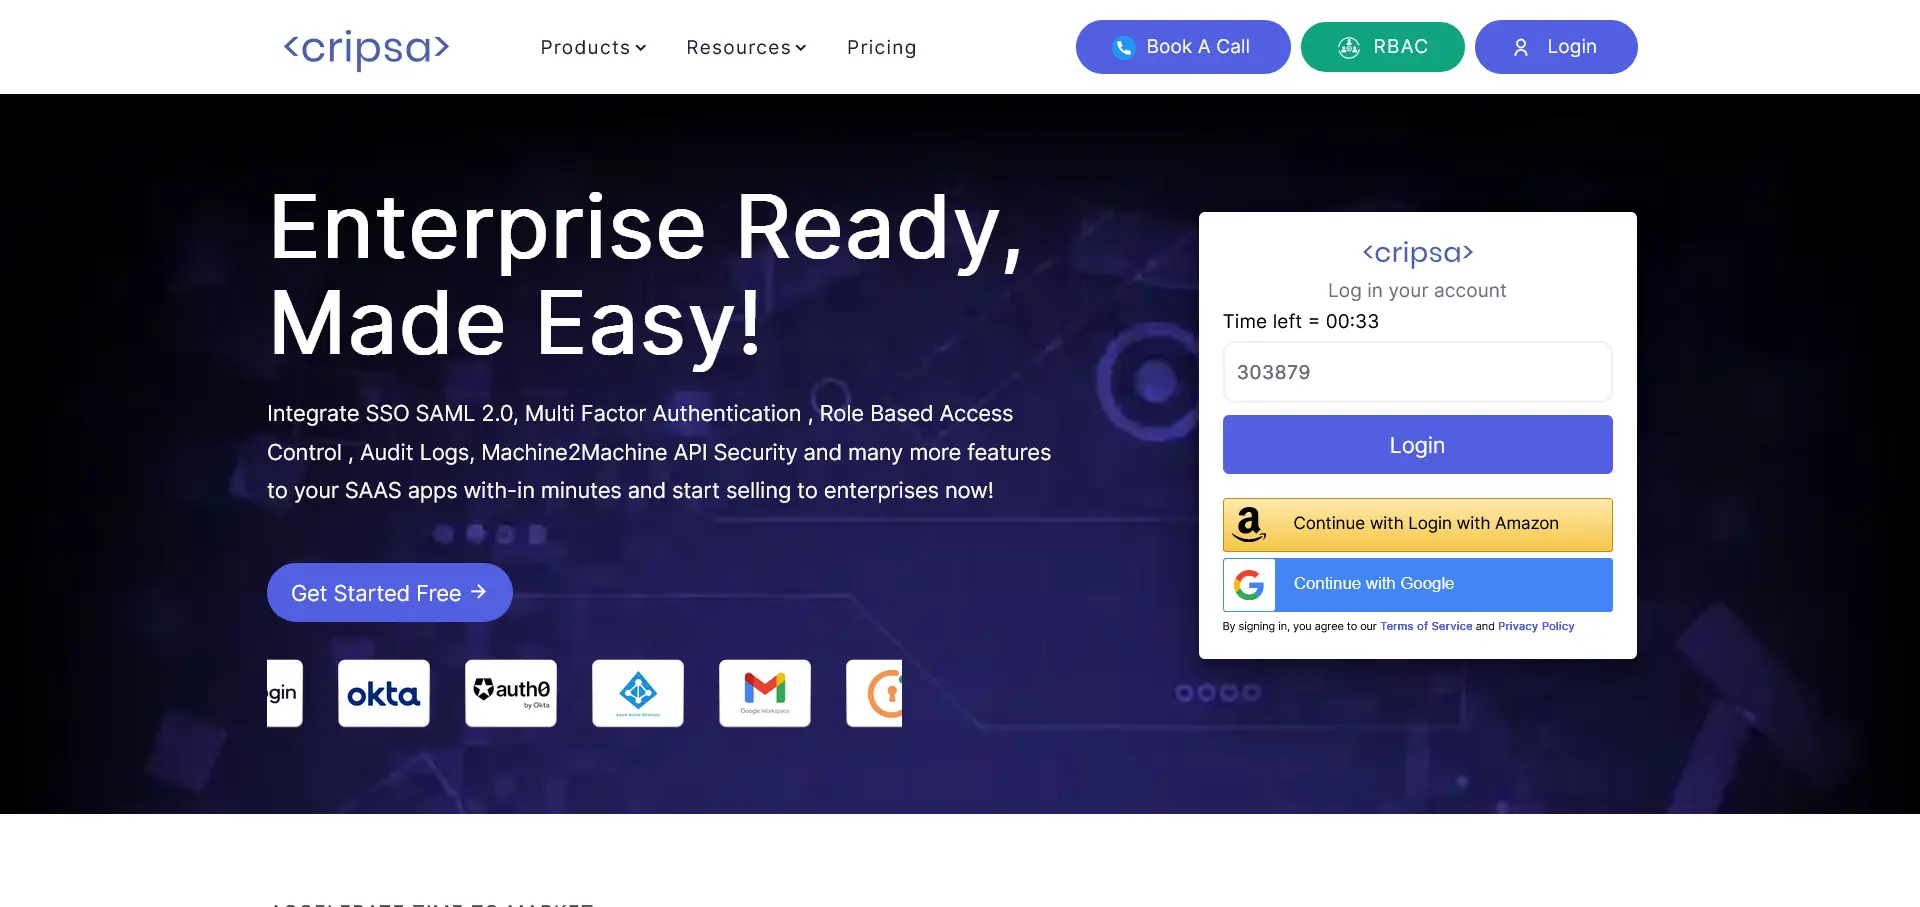
- Initiate the Authentication Workflow: Utilize the unique Code link obtained during the Application Registration phase to trigger the authentication workflow for end users. Depending on the product, the login prompt may differ, including options like Password with or without Multi-Factor Authentication (MFA).
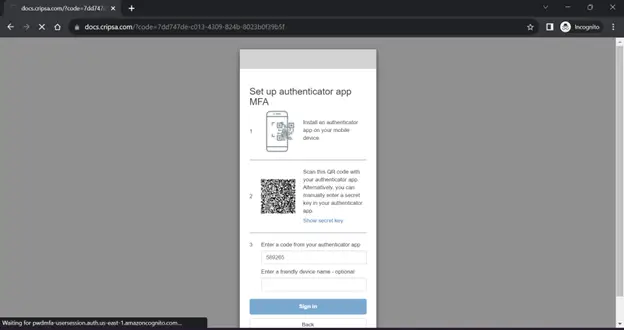
Note: In this Document example, we'll walk you through the creation process of a project that utilizes Password MFA. Keep in mind that you can select any of the "Create Project" options available in various Cripsa Inc products. The steps provided below are specific to the Password MFA project configuration, but similar steps can be followed for other project types offered by Cripsa Inc.
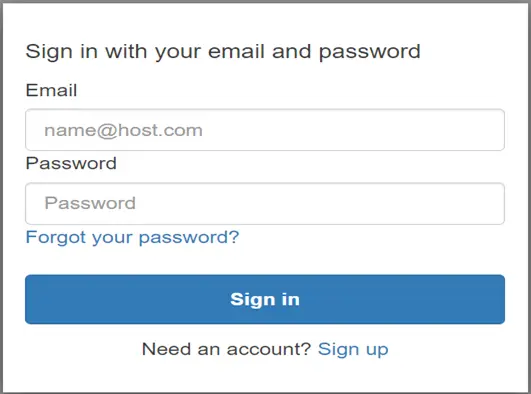
Figure 1: Password-MFA Login Screen
Different products, such as OAuth 2.0, OIDC, SAML, and Passwordless, can have distinct login screens.
This session management approach ensures that your application maintains a consistent user experience by preventing frequent login prompts, thereby enhancing usability and security."
Create Project through Cripsa
Login to Cripsa Dashboard by using email account
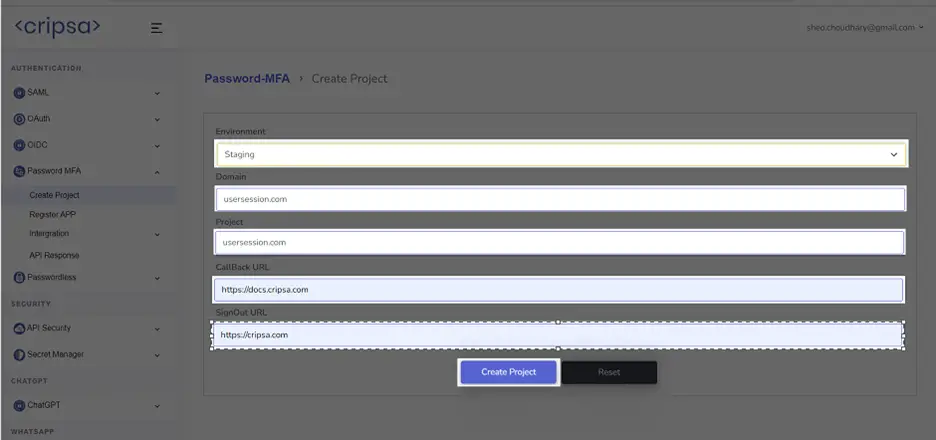
Once logged in Create project for OIDC.
Fill all the details. All the fields are required.
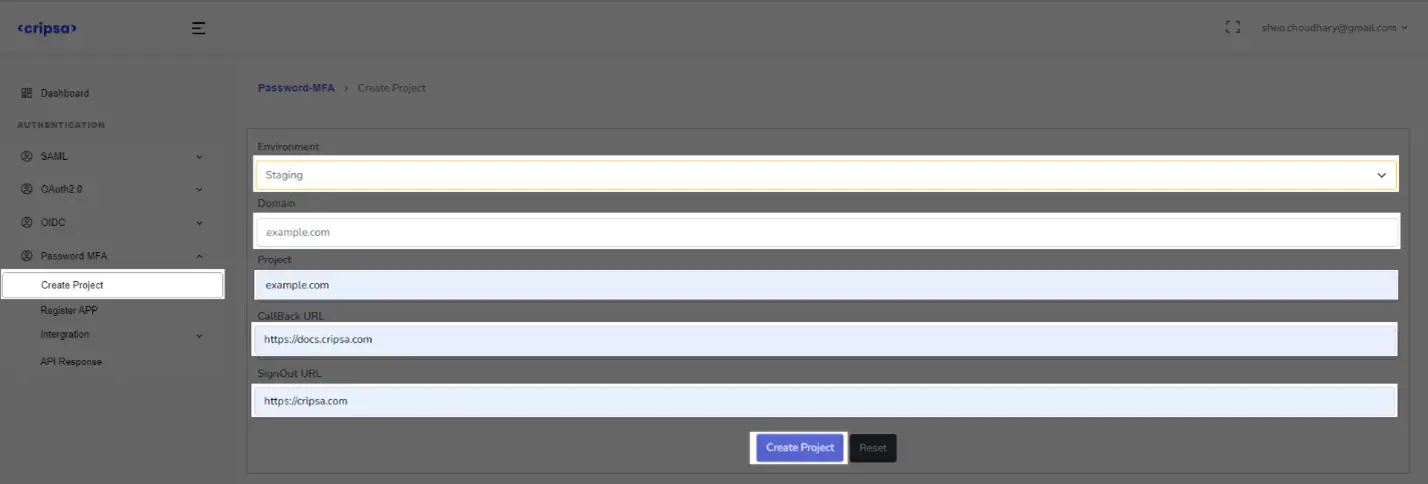
Click on “Create Project”.
Now click on Continue or Register App.
Registering App with Cripsa
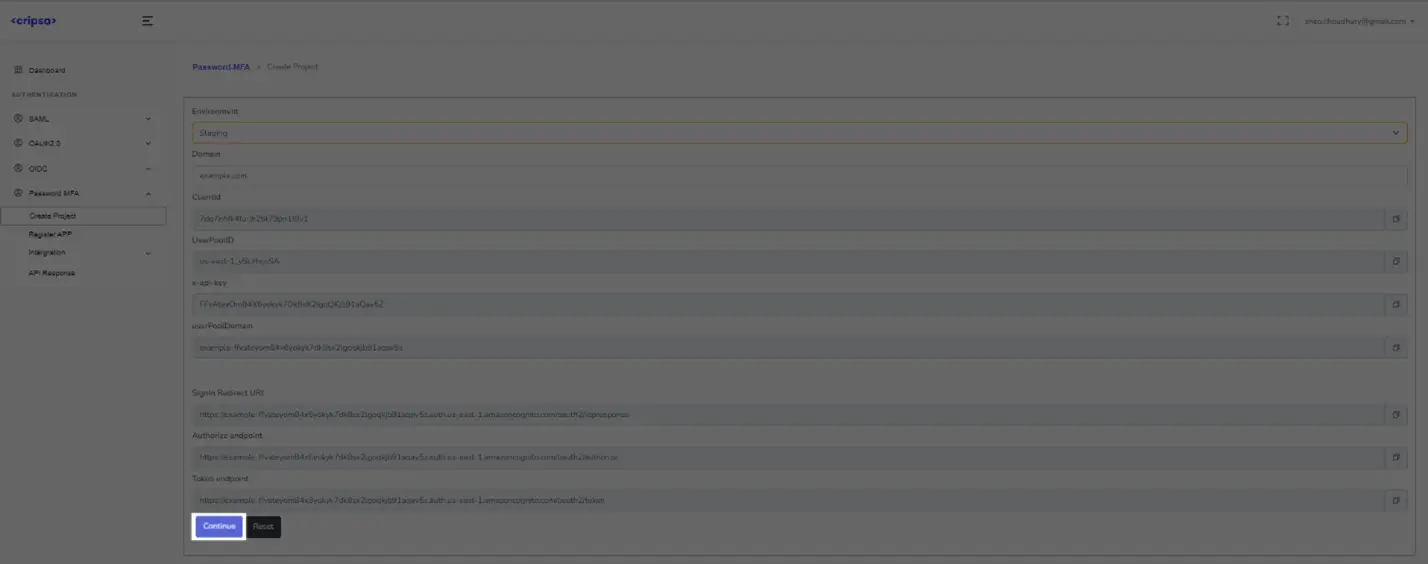
Now go back to https://cripsa.com/password-mfa-register-app ->Select your project you have just created.
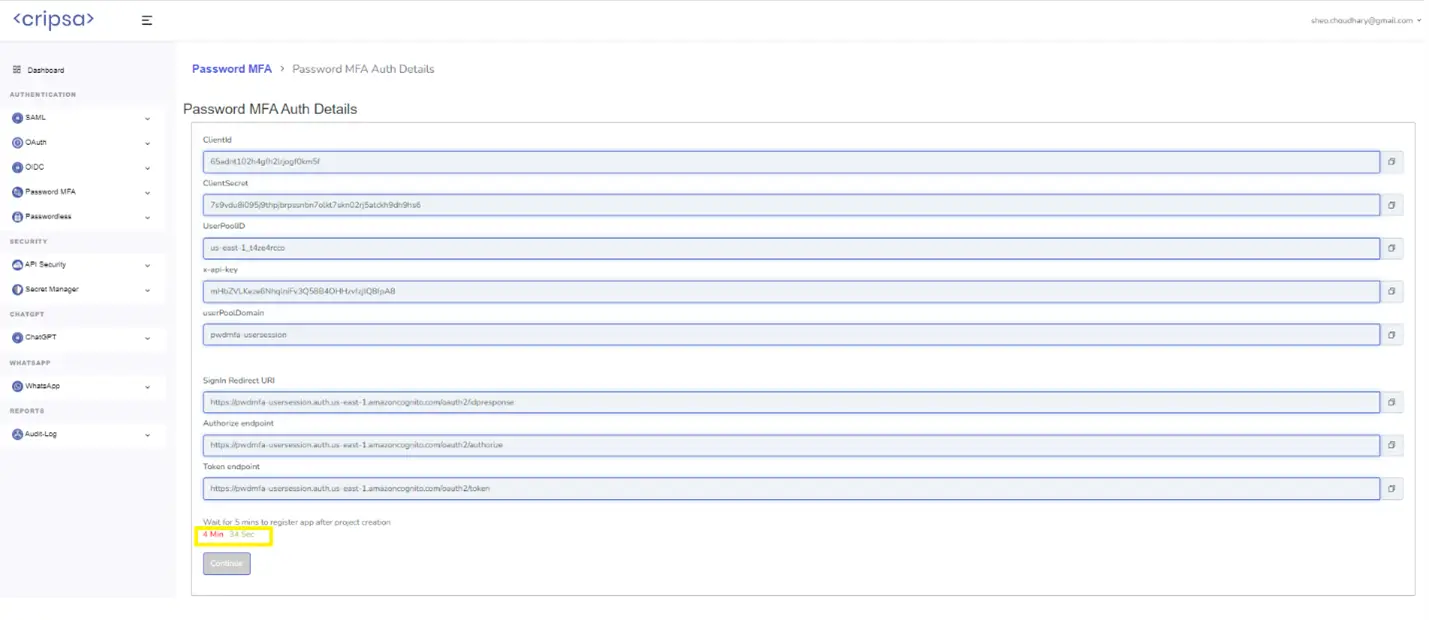
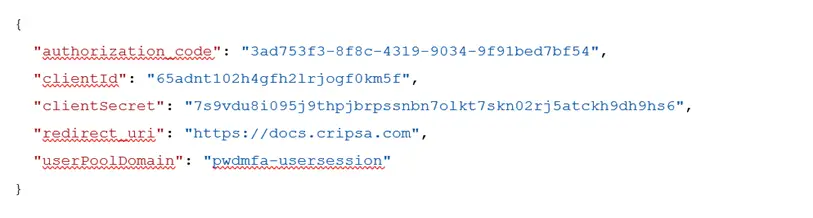
Save all the value in your Database as these can be used in various API calls. Wait for 5 minutes and then click on Continue.
ClientId: 65adnt102h4gfh2lrjogf0km5f
ClientSecret: 7s9vdu8i095j9thpjbrpssnbn7olkt7skn02rj5atckh9dh9hs6
userPoolId: us-east-1_t4ze4rcco
API Key: mHbZVLKeze6NhqlniFv3Q58B4OHHzvfzjlQ8fpA8
userPoolDomain: pwdmfa-usersession
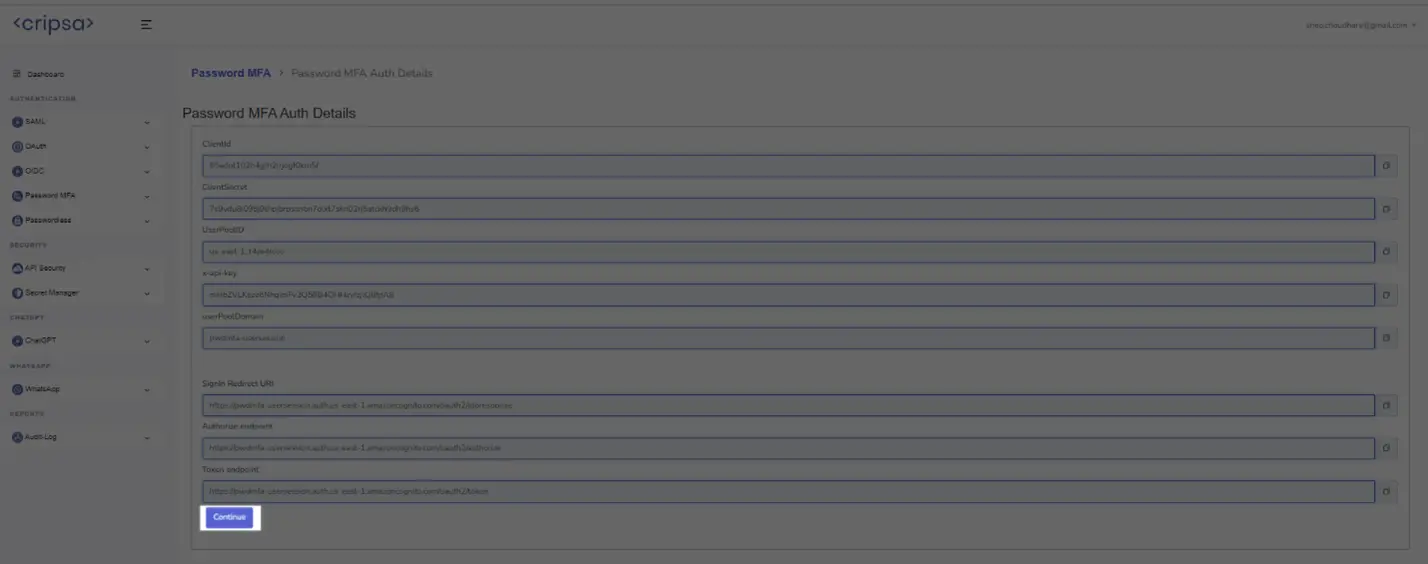
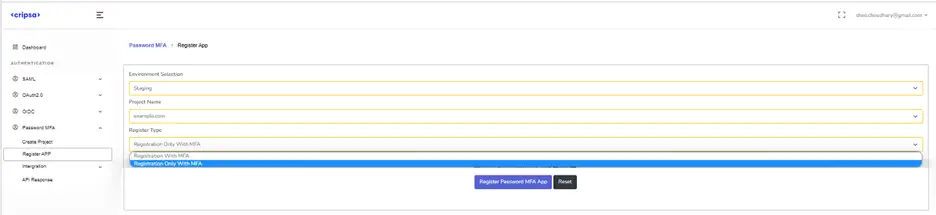
Here Three Fields are Mandatory to fill:
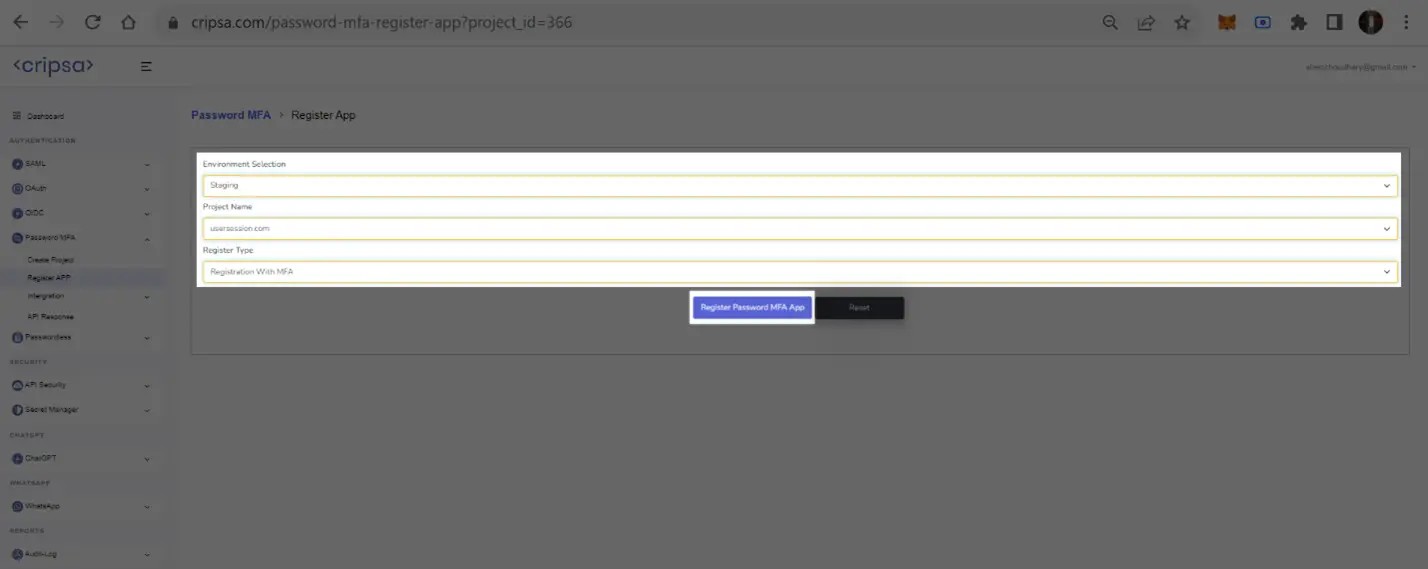
- Environment
- Project Name
- egister Type
In the Register Type there are two options, and one has to select anyone of them as per your requirement.
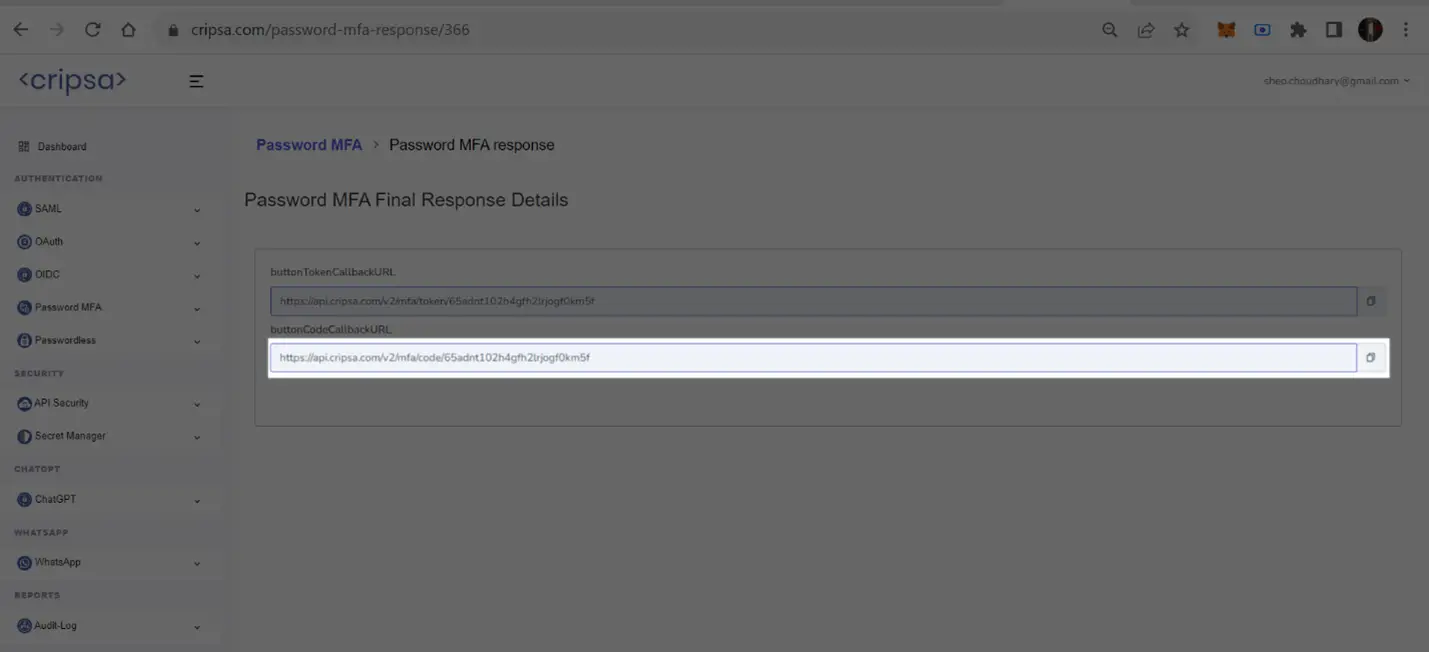
Now the client has to use the “buttonCodeCallbackURL” URL in their home page to bring the Password-MFA login prompt for the end user.
https://api.cripsa.com/v2/mfa/code/65adnt102h4gfh2lrjogf0km5f
User Registration through Sign-up
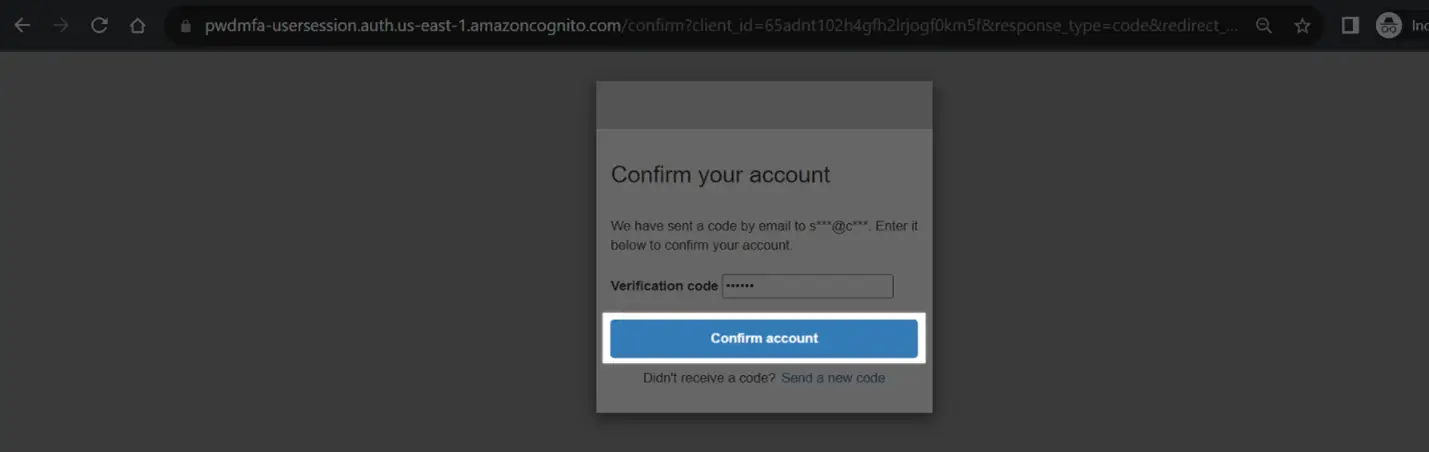
Access the code URL and click on Sign up
https://api.cripsa.com/v2/mfa/code/65adnt102h4gfh2lrjogf0km5f


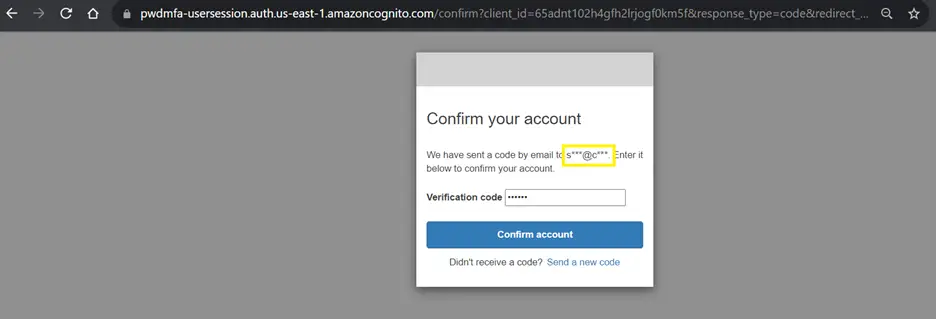
Now go to the e-mail ID and note down the verification code.

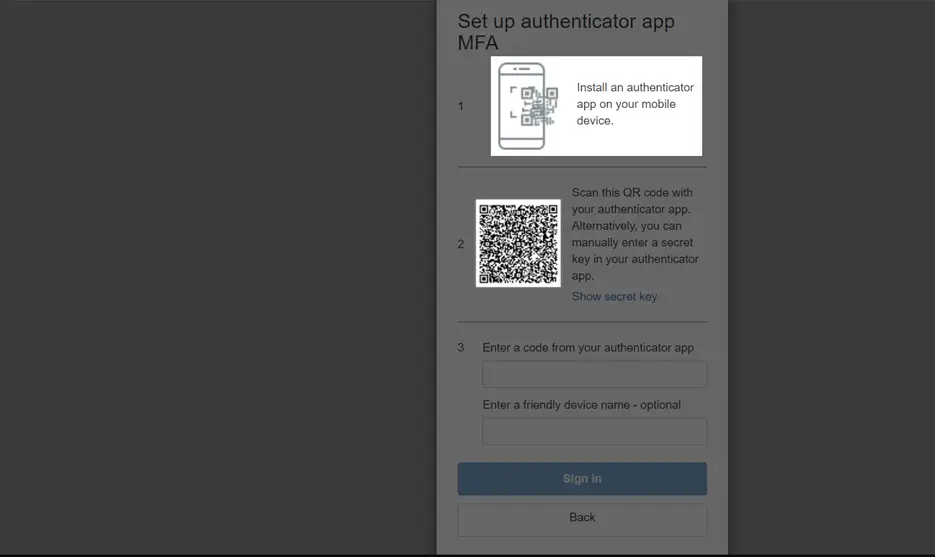
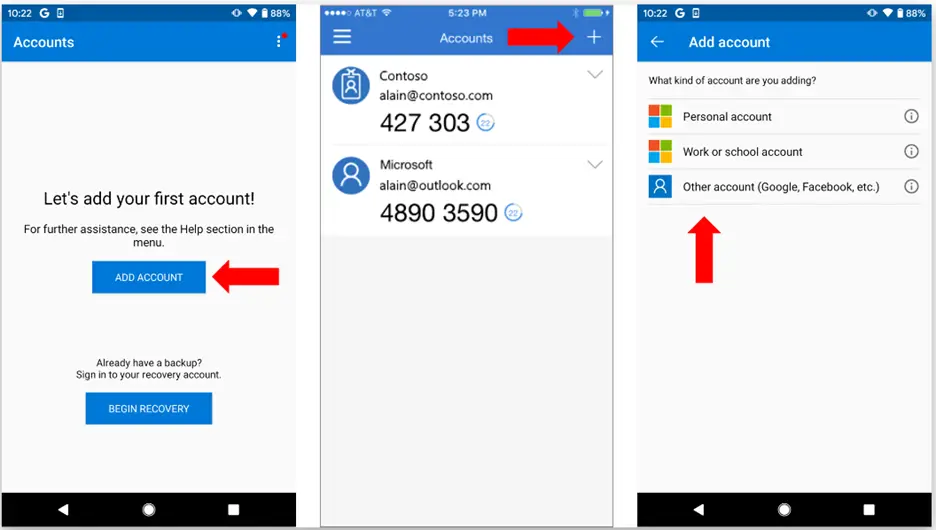
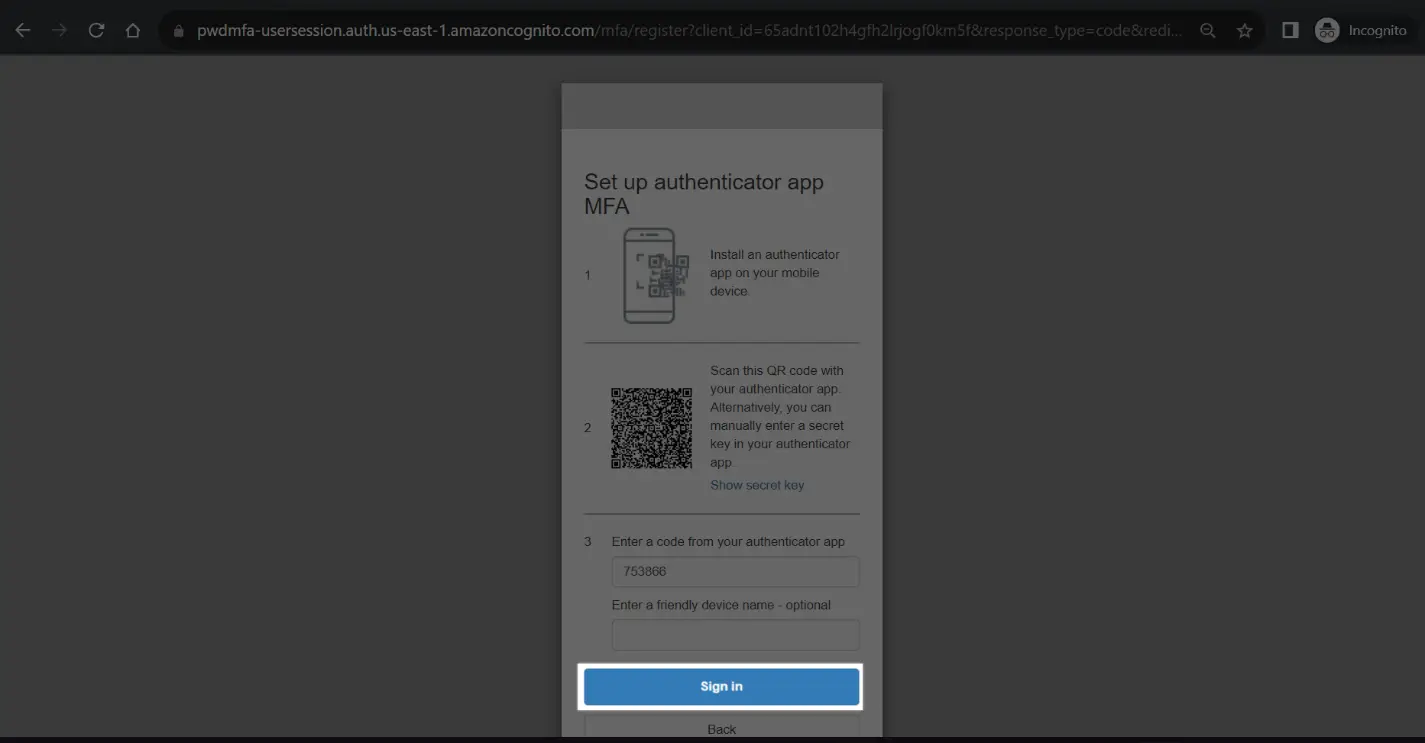
Now install Authenticator App (Google Authenticator or Microsoft Authenticator ) and scan the code to get the verification code.
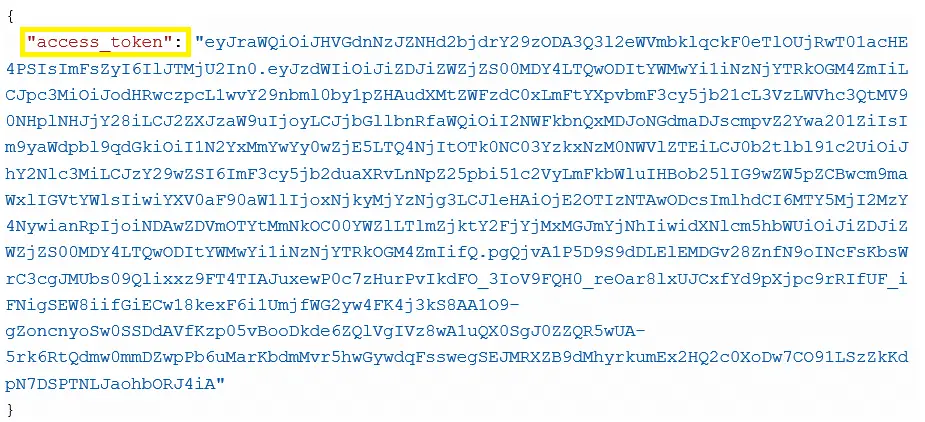
After the user completes the registration process, upon a successful login, the session will provide a "code." Remember to either extract this code from the URL or capture the code that is utilized to retrieve the Access Token, ID Token, and Refresh Token for the purpose of session management.
For example, for the purpose of this document I have received the following code after login:
Code: 3ad753f3-8f8c-4319-9034-9f91bed7bf54
Note: The code is valid for a single use, and if any problems arise, the user should close the session and log in again to generate a new code. Failure to do so may result in an inability to obtain the necessary token, accompanied by an "Invalid_grant" or “Null” error.
Getting Tokens (ID, Access and Refresh) from Code
The payload for this API call would be like the following:
Call the URL: https://api.cripsa.com/v2/sessionmgt/gettokenfromcode
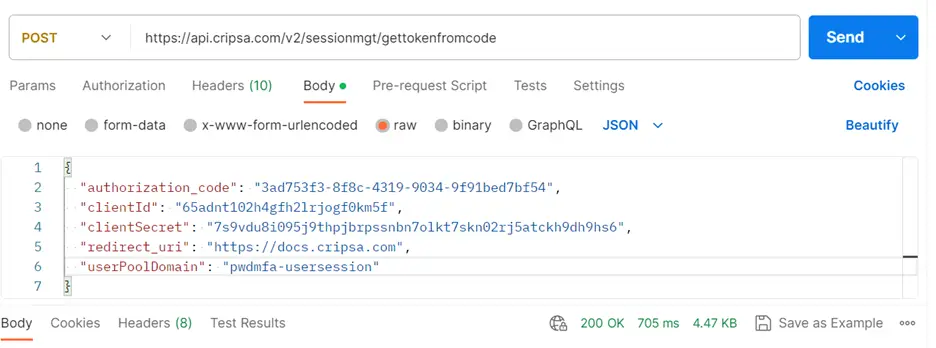
Note: Please make sure that in the Header you are sending your own API Key which has been generated while creation of the project.

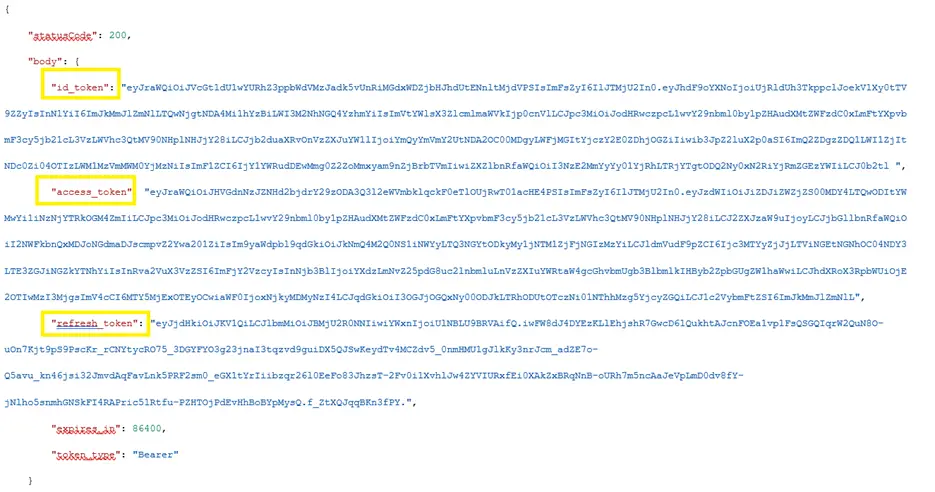
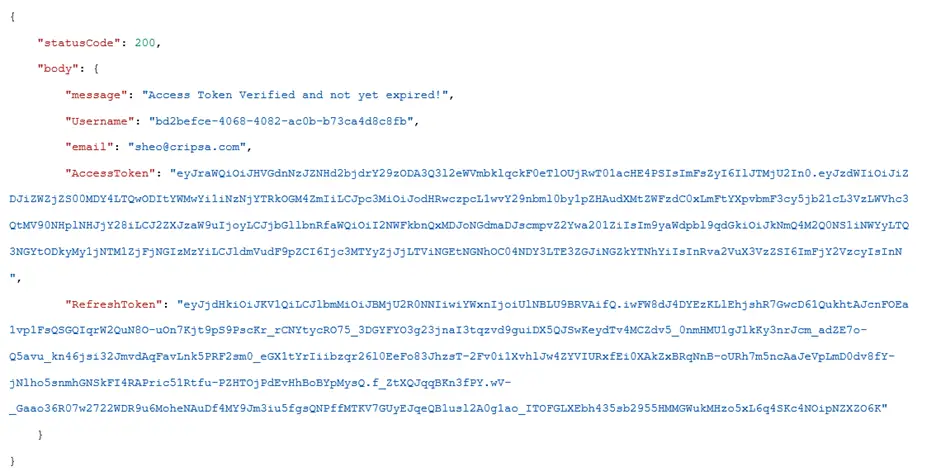
The Response would be as follows:
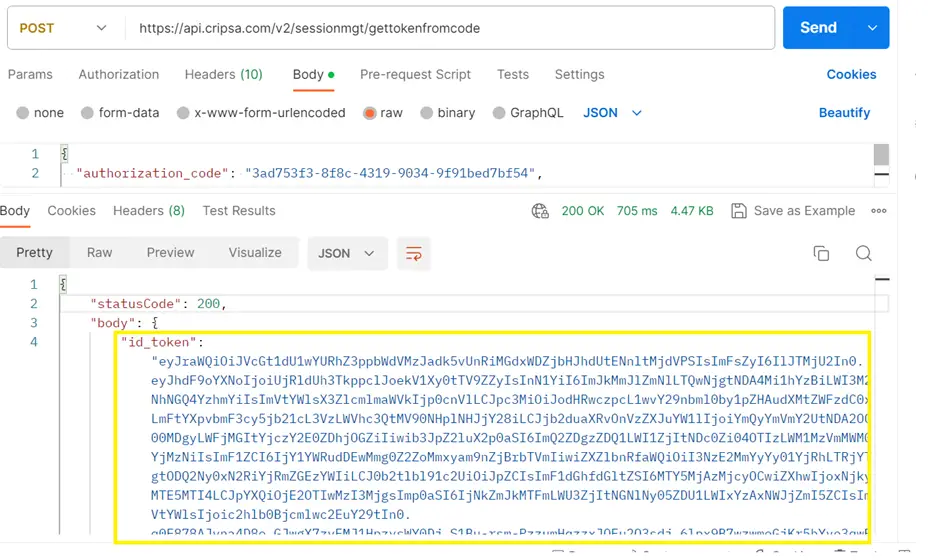
The full response would be as follows:
One can find the reference code here:
https://cripsa.com/session-mgt-get-token-from-code
Detail on ID, Access and Refresh Token
Once the authentication is successful, Cripsa Backend Systems provides you with Access Token, ID Token, and Refresh Token.
- The Access Token is used to authorize the user to access resources within your application.
- The ID Token contains user profile information and is typically used for identity verification.
- The Refresh Token allows you to obtain new tokens without requiring the user to re-enter credentials.
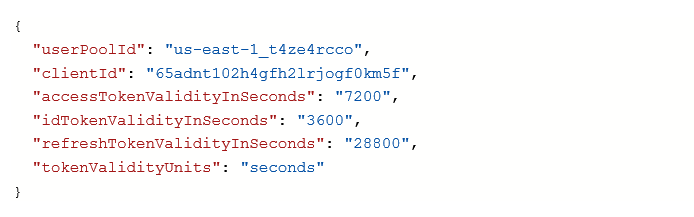
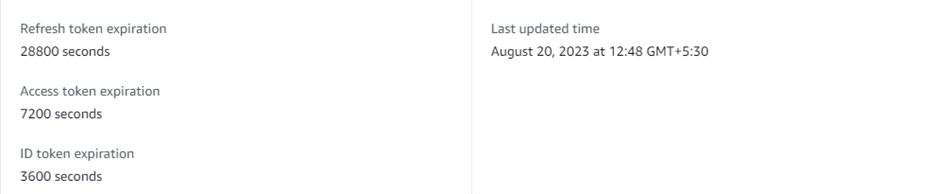
The following screen shot gives an overview on the duration of various token session validity:

This means the ID Token and Access Token expires every single day. These tokens refreshed through Refresh Token for a period of 30 days (max). So, the client has to save these tokens in their database and call the API described below to maintain User session.
Refresh Access Token by use of Refresh Token
The process of refreshing the Access Token within the context of Cripsa Inc involves a seamless and automated interaction between your application and our provided API. This mechanism ensures that your customer's end users can enjoy uninterrupted sessions without the need for frequent logins.
Once a user successfully logs in and their initial Access Token is generated, your application can utilize the Refresh Token provided by Cripsa Inc. This Refresh Token, acting as a key, is employed to call a dedicated API endpoint. This API, meticulously designed to cater to your session management needs, enables the renewal of the Access Token.
Upon receiving the API response, your application extracts the new Access Token and updates it within your database, associated with the user's profile. This step is crucial for maintaining the user's session, as the refreshed Access Token allows continuous access to the application's resources.
By integrating this refreshed Access Token into your database, your application effectively extends the user's session without requiring them to log in again. This user-friendly approach remains valid until the Refresh Token itself expires, which occurs after a span of 30 days. This streamlined process not only enhances the user experience but also contributes to the security and efficiency of your application's session management, ensuring your users can seamlessly access the application's features throughout their sessions.
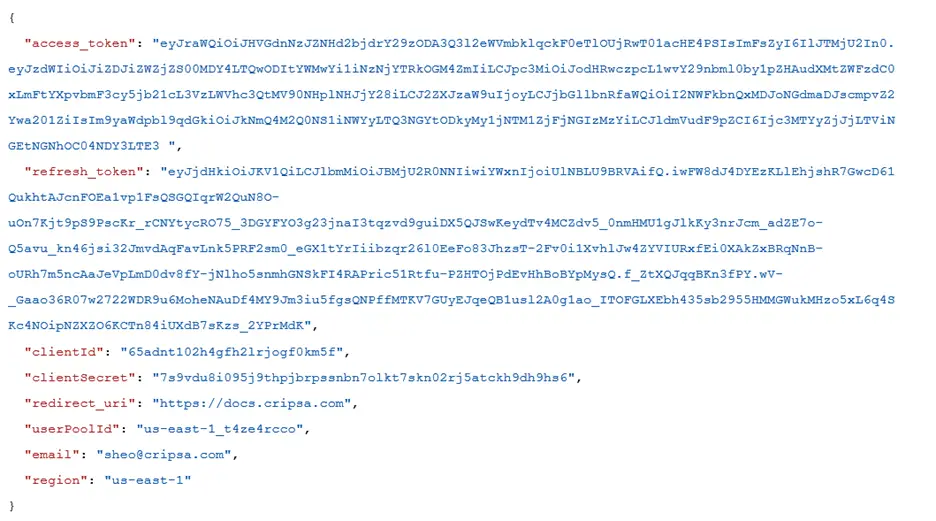
The payload for the refresh Access Token API
“https://api.cripsa.com/v2/sessionmgt/refreshaccesstoken” is as follows:
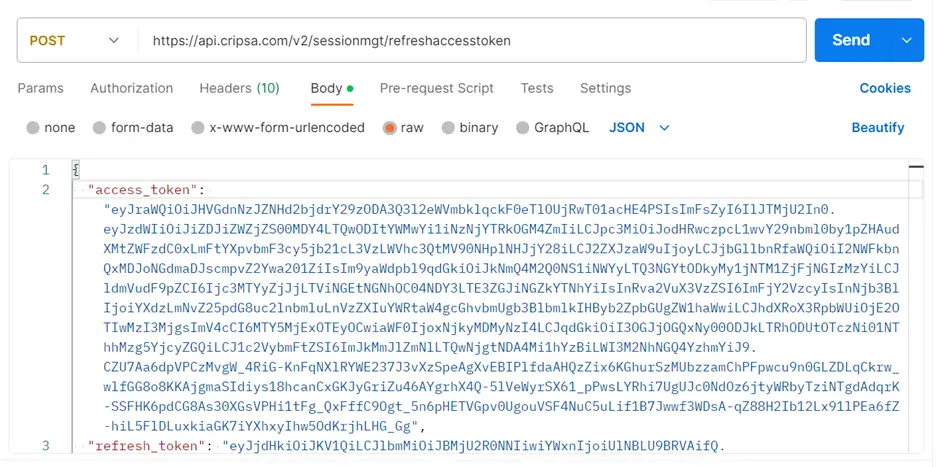
The screen shot of the Postman request is as follows:

Note: Please make sure that in the Header you are sending your own API Key which has been generated while creation of the project.
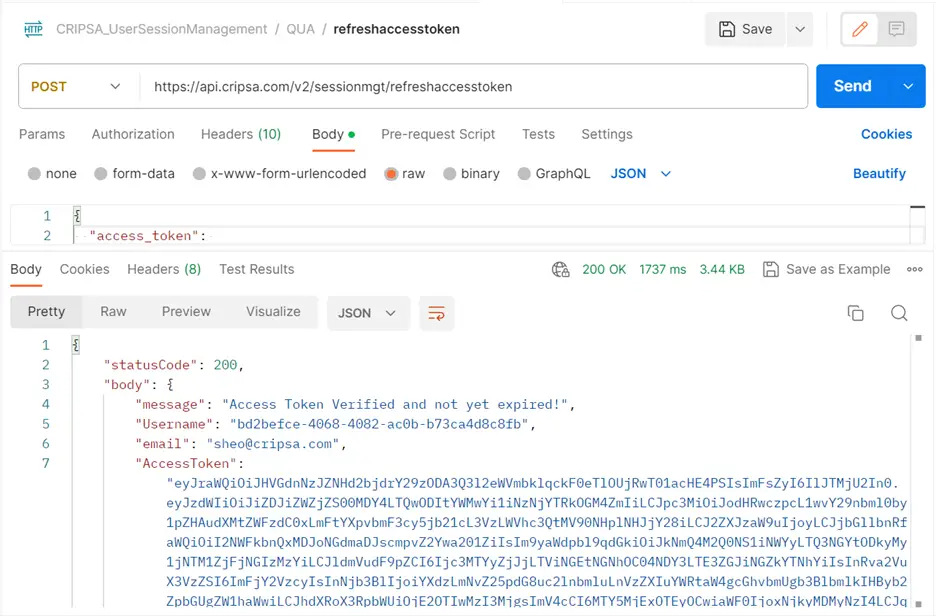
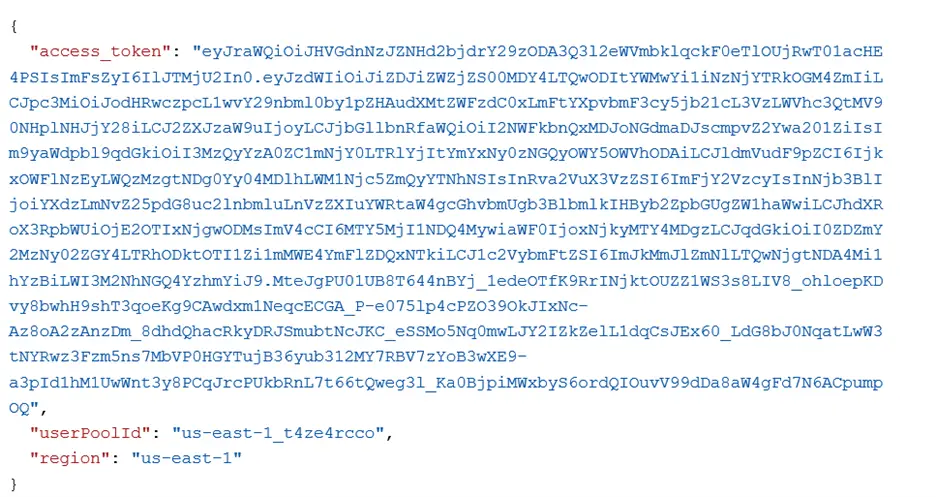
One will get the response as follows:
The Full Response body is as follows:
Note: The above API not only refresh the Access Token but it also verify the validity of the token as well.
API reference code has been given in the following URL:
https://cripsa.com/session-mgt-verify-access-token
Verify Access Token
Cripsa Inc Backend Systems offer a robust authentication and authorization solution for your applications. To verify access using Cripsa Inc Backend Systems through the provided API endpoint "verifyaccessoken," you can leverage the authentication tokens issued during user authentication, such as ID tokens and access tokens. These tokens contain crucial user information and permissions. To verify access, your application can send the authentication token to the "verifyaccessoken" endpoint. This endpoint will perform token validation against the Cripsa Inc user pool, ensuring the token's authenticity, signature, and expiration. The endpoint will also validate audience claims to ensure the token is intended for your application. Furthermore, you can implement role-based or attribute-based authorization checks within your application logic, determining whether the authenticated user possesses the necessary permissions to access the requested resource. By seamlessly integrating token verification and authorization checks into your application's API endpoints, you establish a secure and controlled access mechanism. This ensures that only authorized users can interact with your application's resources while benefiting from Cripsa Inc's robust backend authentication system.
To verify Access Token, the API end point is as follows:
https://api.cripsa.com/v2/sessionmgt/verifyacccesstoken
The payload of verify access token is as follows:
Note: Please make sure that in the Header you are sending your own API Key which has been generated while creation of the project.

The Postman Output is as follows:
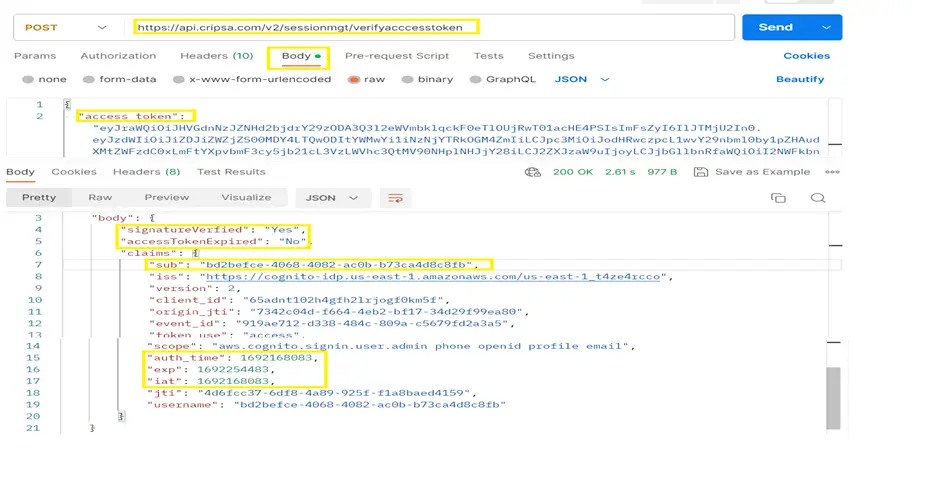
Now, the client employs diverse application logic based on the outcomes of the aforementioned call, determining whether to permit or refuse access to end users. The essential fields highlighted in the provided screenshot guide this decision-making process. These critical fields include:
signatureVerified: This field indicates the validity of the signature used to sign the Access Token. It serves as a key factor in verifying the authenticity of the token.
accessTokenExpired: This field denotes the validity status of the AccessToken. If the value of this field is "Yes," it triggers a further examination of the `signatureVerified` value. If both values are affirmative, the client proceeds to invoke the "Refresh Access Token" API endpoint. This action aims to extend the AccessToken's validity period.
auth_time: This field signifies the moment when the AccessToken was initially issued for the user. It provides a reference point for assessing the duration of the user's session.
Exp: The "Exp" field specifies the expiration time of the AccessToken. It serves as a timestamp indicating when the AccessToken will no longer be valid for use.
These highlighted fields play a pivotal role in determining access control decisions within the client's applications. By leveraging this information, the client ensures secure and timely access for authorized users while taking appropriate actions to refresh and manage AccessToken validity as needed.
The reference detail one can find in the URL :
https://cripsa.com/session-mgt-verify-access-token
Get User Detail from Access Token
In the context of our operational framework, Cripsa Inc offers a valuable resource for our client's access control processes. With Cripsa's provided API endpoints, our client gains the capability to extract vital user information directly from the Access Token. This functionality plays a pivotal role in enhancing our access control decisions and user experience.
As our client's applications navigate the intricacies of access provisioning, they rely on a spectrum of application logic informed by prior interactions. These decisions often hinge on the authenticity and validity of Access Tokens. Cripsa's "userinfofromaccesstoken" API endpoint, integrated seamlessly into our system, presents a streamlined approach to acquire crucial user details from the Access Token.
When an Access Token's validity is questioned, our process involves assessing the AccessToken's signature and expiration status. Upon a positive outcome, the client's application interfaces with the "userinfofromaccesstoken" endpoint. This interaction initiates the retrieval of pertinent user information, empowering our access control systems with the necessary data to make informed choices.
By adopting this approach, our client elevates both security and efficiency in its operations. The seamless integration of Cripsa's API endpoints accelerates the acquisition of user information, fostering accurate and responsive access control decisions. This synergy between token verification and user information extraction reinforces our commitment to a robust, user-centric approach to access management.
To User Information from Access Token, the API end point is as follows:
https://api.cripsa.com/v2/sessionmgt/userinfofromaccesstoken
The payload of verify access token is as follows:
Note: Please make sure that in the Header you are sending your own API Key which has been generated while creation of the project.

The Postman Output is as follows:
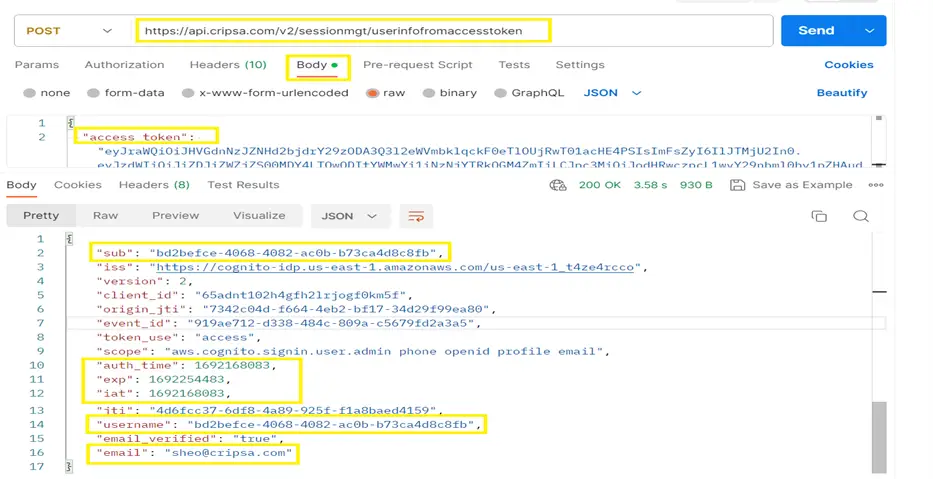
Now, the client employs diverse application logic based on the outcomes of the aforementioned call, determining whether to permit or refuse access to end users. The essential fields highlighted in the provided screenshot guide this decision-making process. These critical fields include:
email: This field indicates the email ID of the end user for which AccessToken belongs.
username/sub: This field provides the information about the unique user ID created in Cripsa Inc Database for the authenticated user.
auth_time: This field signifies the moment when the AccessToken was initially issued for the user. It provides a reference point for assessing the duration of the user's session.
Exp: The "Exp" field specifies the expiration time of the AccessToken. It serves as a timestamp indicating when the AccessToken will no longer be valid for use.
These highlighted fields play a pivotal role in determining access control decisions within the client's applications. By leveraging this information, the client ensures secure and timely access for authorized users while taking appropriate actions to refresh and manage AccessToken validity as needed.
The reference detail one can find in the URL :
https://cripsa.com/session-mgt-user-info-by-access-token
Revoke Access Token and Sign-Out the User Globally
Cripsa Inc extends a valuable service through its API endpoints, enabling clients to execute global sign-out actions, effectively logging a user out from all devices. Termed "GlobalSignOut," this feature holds the capability to nullify a spectrum of tokens—including identity, access, and refresh tokens—originating from Cripsa Inc Systems. By invoking GlobalSignOut, these tokens lose their validity, thereby ensuring a comprehensive logout experience across all user devices.
It's noteworthy that while the GlobalSignOut process renders tokens void, users still maintain a pathway to seamless access through a hosted UI cookie. During the span of the 1-hour cookie validity period, individuals can continue to leverage this hosted UI cookie to secure new tokens. This dynamic approach ensures that the user's transition from logged-out status to re-authentication remains smooth and efficient. Cripsa Inc's provision of these functionalities underlines their commitment to optimizing user security and convenience within their system.
To Revoke Access Token, the API end point is as follows:
https://api.cripsa.com/v2/sessionmgt/revokeaccesstoken
The payload of verify access token is as follows:
Note: Please make sure that in the Header you are sending your own API Key which has been generated while creation of the project.

The Postman Output is as follows:
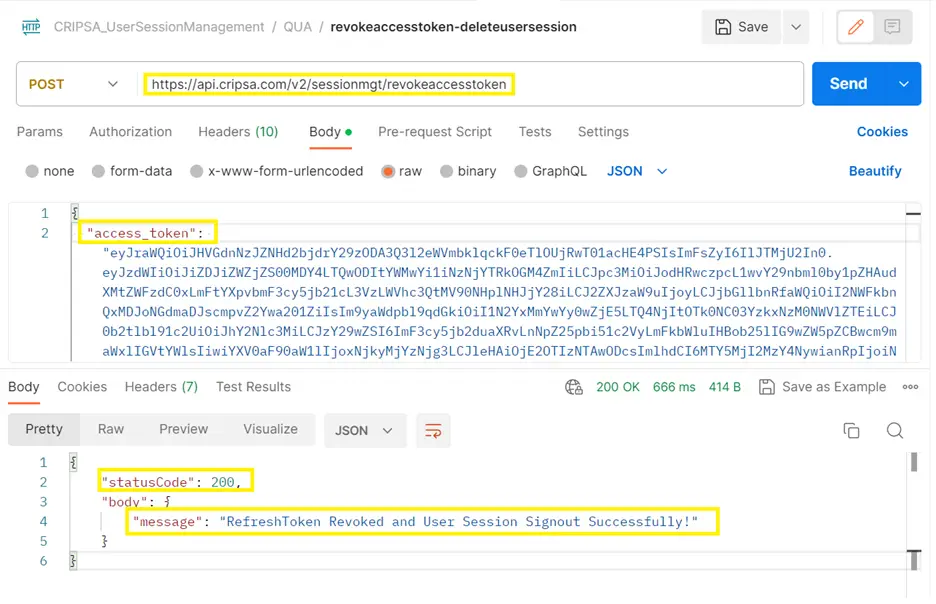
Your application remains unaware of a user's access token being revoked unless it endeavors to authorize a user pools API request utilizing an access token that incorporates the "signin" scope. Otherwise, your application might continue to accept access tokens until their expiration without detecting the revocation.
The reference detail one can find in the URL :
https://cripsa.com/session-mgt-revoke-access-token-delete-user-session
Update Token Validity Period
Cripsa Inc offers a comprehensive API that empowers developers to manage the validity time of tokens, including ID tokens, access tokens, and refresh tokens. This functionality enables you to fine-tune the session duration for your users, enhancing security and user experience. By using this API, you can dynamically adjust the expiration time of tokens to align with your application's specific requirements. The default token validity times provided by Cripsa Inc Backend Systems are typically 1 hour for the ID token and access token, and 30 days for the refresh token. However, with Cripsa Inc's token validity time update API, you have the flexibility to customize these values according to your application's needs. This ensures that your users' sessions remain active for the desired duration, promoting seamless interactions without compromising security. Whether you need to extend or shorten token validity, Cripsa Inc's API provides you with the tools to tailor your application's authentication and authorization mechanisms with precision.
To update validity period for Token, the API end point is as follows:
https://api.cripsa.com/v2/sessionmgt/modify-access-id-token-validitytime
The payload of verify access token is as follows:
Note: Please make sure that in the Header you are sending your own API Key which has been generated while creation of the project.

The Postman Output is as follows:
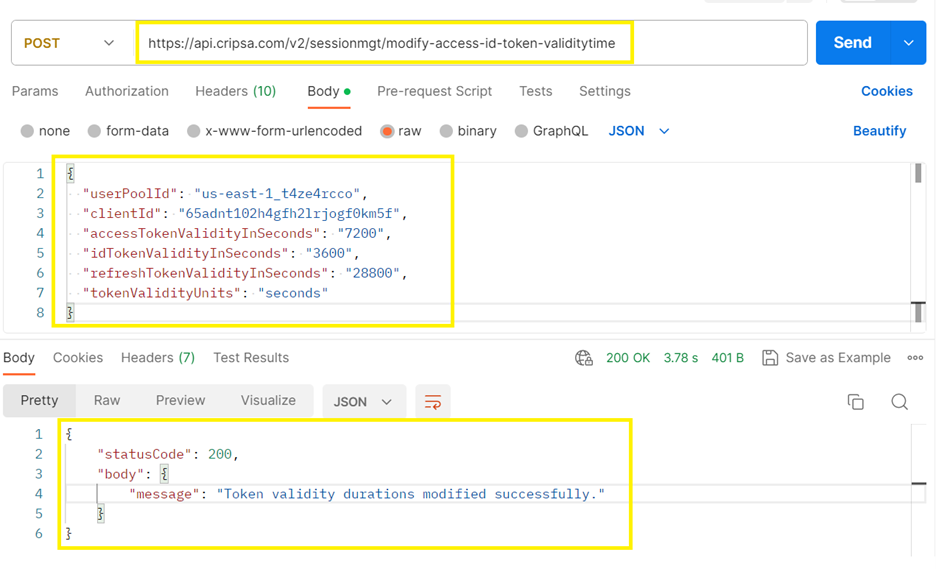
The provided screenshot validates the successful update within the Cripsa Inc Backend system. It's important to note that these details won't be visible to our clients. The screenshot serves as a visual reference for them, illustrating the functionality and operation of this API.
Your application remains unaware of a user's access token being revoked unless it endeavors to authorize a user pools API request utilizing an access token that incorporates the "signin" scope. Otherwise, your application might continue to accept access tokens until their expiration without detecting the revocation.
The reference detail one can find in the URL :
https://cripsa.com/session-mgt-update-access-token-validitytime
Update User Attributes and Getting User RBAC detail through Access Token
Cripsa Inc is dedicated to enhancing user experience and providing developers with robust tools for efficient identity and access management. As part of our commitment, we offer a powerful API that enables seamless updates to user attributes within your applications. This API empowers developers to dynamically modify user attributes, such as roles, group affiliations, preferences, and more, in a secure and controlled manner.
Through this API, developers can seamlessly integrate attribute updates into their application's workflows, ensuring that user profiles remain up-to-date and relevant. Whether you need to adjust roles to grant specific privileges, update contact information, or reflect changes in group affiliations, the Cripsa Inc API for User Attribute Update simplifies the process.
Developers can send requests to the designated endpoint, providing the necessary user identifier and the updated attribute values. Our API securely handles the update process, ensuring data integrity and authentication. This capability proves invaluable in scenarios where user information needs to be adapted without requiring users to undergo an entire authentication process.
Incorporating the Cripsa Inc User Attribute Update API streamlines application maintenance, enhances user personalization, and ensures that user data remains accurate. By seamlessly integrating attribute updates, developers can create applications that reflect real-time user preferences and attributes, enhancing overall user satisfaction and engagement.
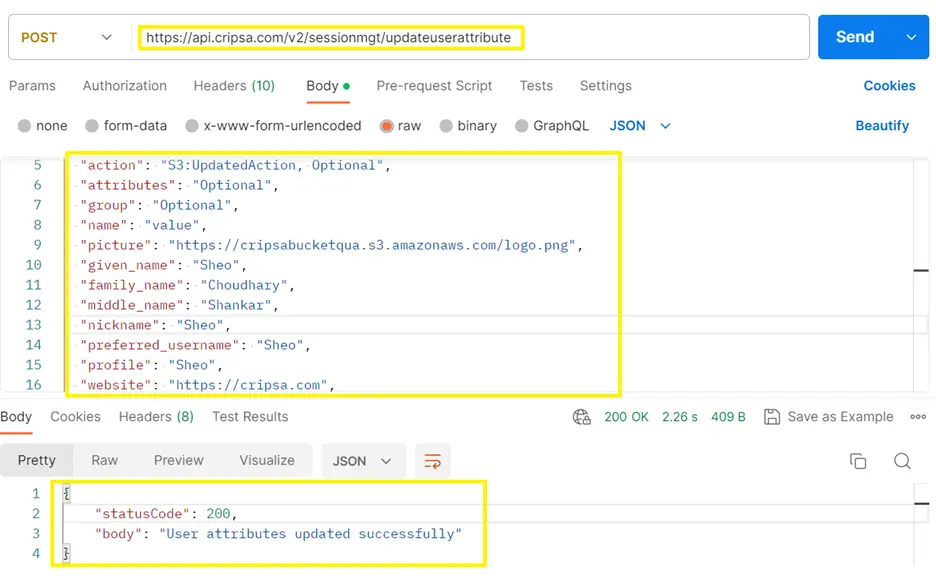
To Update User Attributes, the API end point is as follows:
https://api.cripsa.com/v2/sessionmgt/updateuserattribute
The payload of verify access token is as follows:
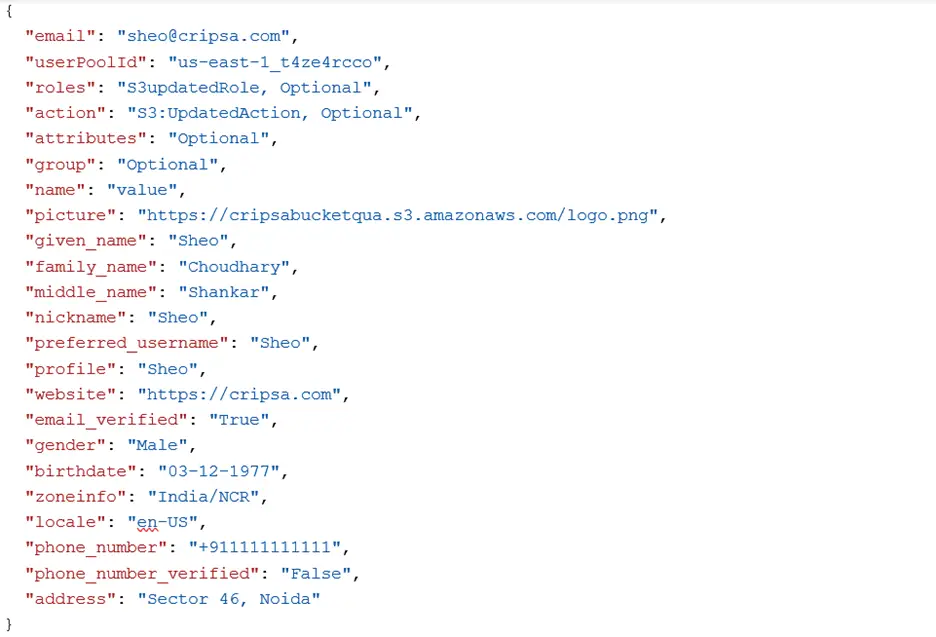
In the above screen shot the first two attributes (email and userPoolId) are mandatory. Rest all are optional.
The Description and type of all the above attributes is described below:
| Attribute Fields | Type | Description |
|---|---|---|
| sub | string | Subject - Identifier for the End-User at the Issuer. |
| name | string | End-User's full name in displayable form including all name parts, possibly including titles and suffixes, ordered according to the End-User's locale and preferences. |
| given_name | string | Given name(s) or first name(s) of the End-User. Note that in some cultures, people can have multiple given names; all can be present, with the names being separated by space characters. |
| family_name | string | Surname(s) or last name(s) of the End-User. Note that in some cultures, people can have multiple family names or no family name; all can be present, with the names being separated by space characters. |
| middle_name | string | Middle name(s) of the End-User. Note that in some cultures, people can have multiple middle names; all can be present, with the names being separated by space characters. Also note that in some cultures, middle names are not used. |
| nickname | string | Casual name of the End-User that may or may not be the same as the given_name. For instance, a nickname value of Mike might be returned alongside a given_name value of Michael. |
| preferred_username | string | Shorthand name by which the End-User wishes to be referred to at the RP, such as janedoe or j.doe. This value MAY be any valid JSON string including special characters such as @, /, or whitespace. The RP MUST NOT rely upon this value being unique, as discussed in Section 5.7. |
| picture | string | URL of the End-User's profile picture. This URL MUST refer to an image file (for example, a PNG, JPEG, or GIF image file), rather than to a Web page containing an image. Note that this URL SHOULD specifically reference a profile photo of the End-User suitable for displaying when describing the End-User, rather than an arbitrary photo taken by the End-User. |
| website | string | URL of the End-User's Web page or blog. This Web page SHOULD contain information published by the End-User or an organization that the End-User is affiliated with. |
| string | End-User's preferred e-mail address. Its value MUST conform to the RFC 5322 [RFC5322] addr-spec syntax. The RP MUST NOT rely upon this value being unique, as discussed in Section 5.7. | |
| email_verified | boolean | True if the End-User's e-mail address has been verified; otherwise false. When this Claim Value is true, this means that the OP took affirmative steps to ensure that this e-mail address was controlled by the End-User at the time the verification was performed. The means by which an e-mail address is verified is context-specific, and dependent upon the trust framework or contractual agreements within which the parties are operating. |
| gender | string | End-User's gender. Values defined by this specification are female and male. Other values MAY be used when neither of the defined values are applicable. |
| birthdate | string | End-User's birthday, represented as an ISO 8601:2004 [ISO8601 2004] YYYY-MM-DD format. The year MAY be 0000, indicating that it is omitted. To represent only the year, YYYY format is allowed. Note that depending on the underlying platform's date related function, providing just year can result in varying month and day, so the implementers need to take this factor into account to correctly process the dates. |
| zoneinfo | string | String from zoneinfo [zoneinfo] time zone database representing the End-User's time zone. For example, Europe/Paris or America/Los_Angeles. |
| locale | string | End-User's locale, represented as a BCP47 [RFC5646] language tag. This is typically an ISO 639-1 Alpha-2 [ISO639 1] language code in lowercase and an ISO 3166-1 Alpha-2 [ISO3166 1] country code in uppercase, separated by a dash. For example, en-US or fr-CA. As a compatibility note, some implementations have used an underscore as the separator rather than a dash, for example, en_US; Relying Parties MAY choose to accept this locale syntax as well. |
| phone_number | string | End-User's preferred telephone number. E.164 [E.164] is RECOMMENDED as the format of this Claim, for example, +1 (425) 555-1212 or +56 (2) 687 2400. If the phone number contains an extension, it is RECOMMENDED that the extension be represented using the RFC 3966 [RFC3966] extension syntax, for example, +1 (604) 555-1234;ext=5678. |
| phone_number_verified | boolean | True if the End-User's phone number has been verified; otherwise false. When this Claim Value is true, this means that the OP took affirmative steps to ensure that this phone number was controlled by the End-User at the time the verification was performed. The means by which a phone number is verified is context-specific, and dependent upon the trust framework or contractual agreements within which the parties are operating. When true, the phone_number Claim MUST be in E.164 format and any extensions MUST be represented in RFC 3966 format. |
| address | string | End-User's preferred postal address. The value of the address member is a JSON [RFC4627] structure containing some or all of the members defined in Section 5.1.1. |
| updated_at | number | Time the End-User's information was last updated. Its value is a JSON number representing the number of seconds from 1970-01-01T0:0:0Z as measured in UTC until the date/time. |
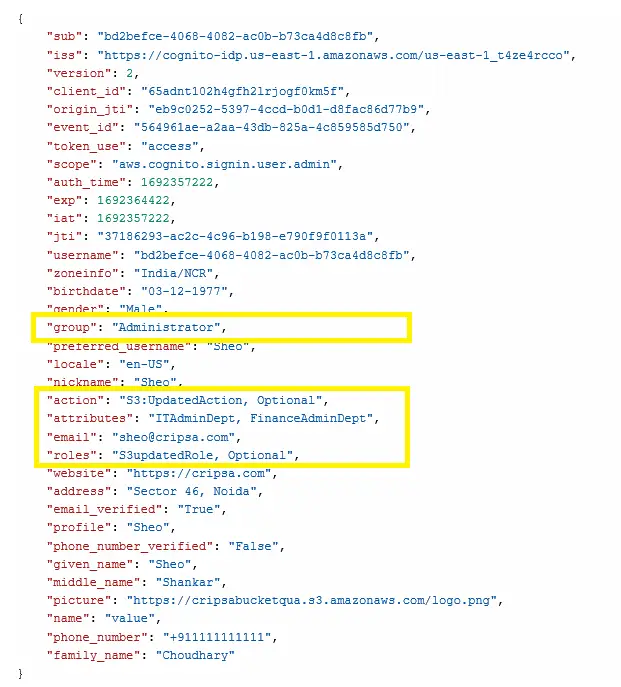
As an integral part of implementing Role-Based Access Control (RBAC) to manage user permissions effectively, we have introduced custom attributes that include roles, actions, attributes, and groups. These attributes play a crucial role in configuring RBAC to match your organization's specific needs.
If your organization operates multiple services and requires granular control over user access based on service name, permitted actions, or specific attributes like department or destination, these custom attributes are key. By tailoring the attribute values, you can precisely define the access privileges for different users.
Here's an illustrative example of how to define roles, actions, and attributes:
Let's consider an application or service named "App01" within your landscape.
For this application, you intend to create a role that encompasses various actions like Update, Delete, Read, Create, and Administer.
Additionally, you want to restrict this role to specific departments such as "ITAdminDept" and "FinanceAdminDept."
Based on this scenario, the attribute values are structured as follows:
- - "action": "<Application/Service Name>:<Action Allowed>"
- - "roles": "<Application/Service Name>+<a suitable word summarizing all actions>"
- - "attribute": "<Department Name>"
Following this convention, the attribute values in our example would be:
- - "action": "App01:Update, App01:Delete, App01:Read, App01:Administer"
- - "roles": "App01AdministrationRole"
- - "attributes": "ITAdminDept, FinanceAdminDept"
It's important to note that you have the flexibility to assign both roles and groups, or opt for assigning either a group or a role alone, based on your requirements. This flexibility empowers you to fine-tune user access permissions in a manner that aligns with your organization's security and operational needs.
Note: Please make sure that in the Header you are sending your own API Key which has been generated while creation of the project.
The Postman Output is as follows:
Upon the user's subsequent sign-in, the ID Token will encompass all the associated user attributes. To retrieve the user information, utilize the following API:
https://cripsa.com/session-mgt-user-info-by-access-token
However, prior to accessing this, you need to utilize the provided code to obtain the Access Token, ID Token, and Refresh Token via the API at
https://api.cripsa.com/v2/sessionmgt/gettokenfromcode
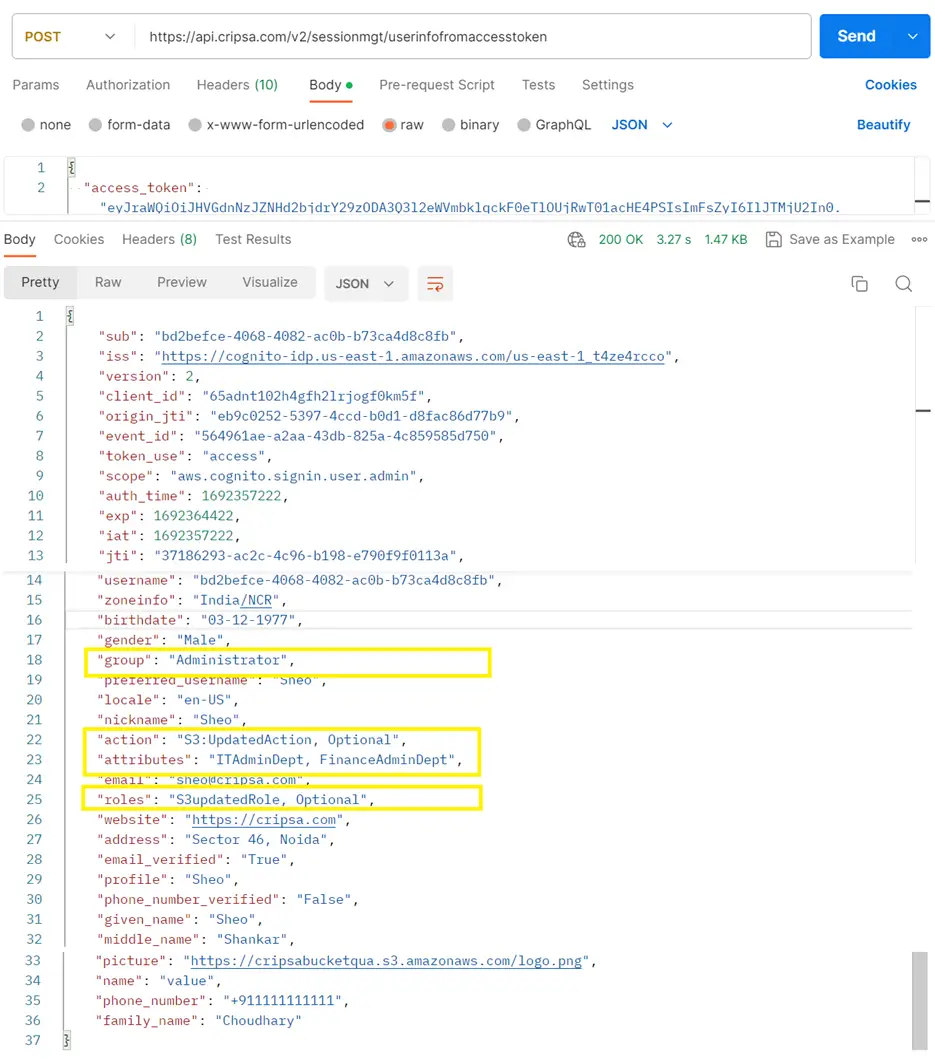
The output of the above request is as follows:
Now, your application's logic can capture the highlighted elements and grant access to your application based on whether the appropriate Role-Action or Group has been assigned. Additionally, access can also be controlled through the use of "attributes".
The reference of the API detail one can find in the URL :
https://cripsa.com/session-mgt-update-user-attribute
Delete User
Cripsa Inc offers a comprehensive API that empowers organizations with the capability to efficiently manage user accounts. One of the key functionalities is the "Delete User" API, which allows for seamless removal of user accounts from the system. This API ensures that administrators and developers have a reliable mechanism to handle account deletions when required.
By leveraging the "Delete User" API provided by Cripsa Inc, administrators can easily trigger the removal of user accounts that are no longer needed or have become inactive. This API streamlines the process of account management, helping to maintain a clean and organized user base within applications and services.
It's essential to understand that using the "Delete User" API should be carried out with careful consideration, as this action is irreversible and permanently removes user accounts and associated data. As such, organizations should exercise caution and follow best practices to ensure that the right accounts are targeted for deletion.
Cripsa Inc's "Delete User" API simplifies the process of managing user accounts, aligning with modern security and data management requirements. This robust feature provides organizations with the control and flexibility needed to efficiently handle user data and maintain the integrity of their applications.
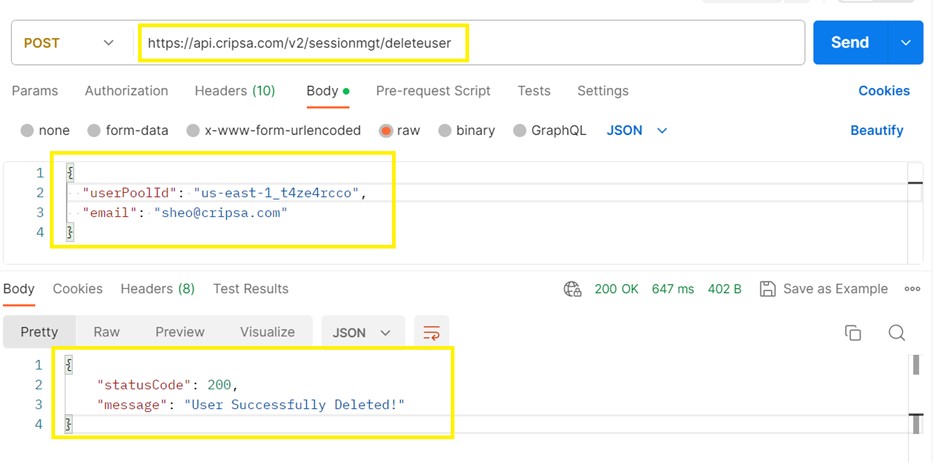
To Delete User, the API end point is as follows:
https://api.cripsa.com/v2/sessionmgt/deleteuser
The payload of verify access token is as follows:

Note: Please make sure that in the Header you are sending your own API Key which has been generated while creation of the project.
The Postman Output is as follows:
When utilizing Cripsa Inc's "Delete User" API to remove user accounts, it's important to exercise caution and follow best practices to ensure the security and integrity of your application and user data. Here are some precautions to take while using this API:
- Authorization and Access Control: Ensure that only authorized personnel, such as administrators or specific roles, have access to the "Delete User" API. Implement appropriate access controls to prevent unauthorized or accidental deletions.
- Confirmation Mechanism: Implement a confirmation mechanism before executing the deletion. This could involve requiring a secondary authentication factor or confirmation prompt from administrators to prevent accidental or unauthorized account deletions.
- Audit Trail: Maintain a detailed audit trail of user deletions. Log relevant information such as the date, time, user requesting the deletion, and the reason for the deletion. This audit trail can help track and investigate any unusual or unauthorized activities.
- User Communication: If possible, notify users or account owners about the impending deletion of their account. This can prevent misunderstandings, and users who still require access can reach out to prevent the deletion.
- Testing and Sandbox Environment: Test the "Delete User" API thoroughly in a controlled environment before deploying it in a production setting. Utilize a sandbox environment to simulate account deletions and identify any potential issues.
- Documentation and Training: Ensure that your team is well-informed about the proper use of the "Delete User" API. Provide comprehensive documentation and training to administrators who have access to this functionality.
- Compliance and Regulations: If your organization operates under specific regulatory frameworks, ensure that the user deletion process aligns with compliance requirements. Follow legal guidelines regarding data retention and deletion.
By taking these precautions, you can effectively leverage Cripsa Inc's "Delete User" API while minimizing risks and ensuring the security of your application's user data.
The reference of the API detail one can finds in the URL :
https://cripsa.com/session-mgt-delete-user
Frequently asked questions
1. How many Different Type of Tokens Cripsa Systems will be releasing as part of the user session management and what is there purpose?
There are three types of tokens:
- The Access Token is used to authorize the user to access resources within your application.
- The ID Token contains user profile information and is typically used for identity verification.
- The Refresh Token allows you to obtain new tokens without requiring the user to re-enter credentials.
2. What are the different API end points provided by Cripsa Inc to Manage user and User Session.
• For Getting Access Token and ID token from CODE, the API end point reference detail is as follows:
https://cripsa.com/session-mgt-get-token-from-code
• For refreshing the Access Token using Refresh Token, the API end point reference detail is as follows:
https://cripsa.com/session-mgt-refresh-access-token
• To verify Access Token, the API end point reference detail is as follows:
https://cripsa.com/session-mgt-verify-access-token
• To Get user details from Access Token, the API end point reference detail is as follows:
https://cripsa.com/session-mgt-user-info-by-access-token
• To update Token Validity period, the API end point reference detail is as follows:
https://cripsa.com/session-mgt-update-access-token-validitytime
• For Getting user attribute updated, the API end point reference detail is as follows:
https://cripsa.com/session-mgt-update-user-attribute
• To Delete user the API end point reference detail is as follows:
https://cripsa.com/session-mgt-delete-user
Note: Please make sure that this API end point is used with utmost care and it’s detail should not be leaked.